Showing posts with label PROJECTS. Show all posts

Wednesday, July 6, 2011

Video Wireless Transmitter


To design and build a wireless transmitter that works over the FM frequency and allows the transfer of a video/audio signal over a certain distance to an FM tuner. 
Click on this image to enlarge

  In this fast-paced world, there is little time for inconveniences and a greater need for portability and adaptability. The idea for an Audio/Video transmitter stems from this need. There may have been times when you've wanted to hook up your VCR from one room to another television set in another room. But that would have entailed that you first unhook all kinds of wires and plugs from the primary TV set; carry the VCR to the next TV set; and then finally re-wire everything together. An Audio/Video transmitter will let you do just about the same thing. But it would offer other conveniences as well. For example, it would allow you to set up security cameras around your home which would send video signals directly to a TV or VCR. And, there are no cumbersome wires and cables to line throughout the intended area.

Tube Li Amplifier

The unit is powered directly from the 120 volt AC line, with no power transformers. Filaments are wired in series, with the total adding up to 117 volts (35 + 35 + 35 + 12). The 35W4 forms a half-wave rectifier, which is filtered by a three-stage RC network. The B+ for the output stage plates and screens are taken from the second capacitor, and the B+ for the preamp and phase inverter from the third capacitor in the filter. 


The input signal to the amplifier is applied directly to the volume control pot, from whence it passes through a variable high-pass filter (the "Treble" control). When the wiper is set to minimum, response is approximately flat (though actual frequency response will depend somewhat on volume control setting). When it's turned to maximum, higher frequencies are favored, with the lower 3 dB corner at around 1500 Hz. and the higher pole (plateau) around 4000 Hz. For testing purposes, the volume control was set to maximum and the treble control to minimum, to minimise the effect of this control. 

click on this image to enlarge


The output of the volume/treble control circuit is applied directly to the grid of the first section of a 12AX7 twin triode. A partially bypassed cathode resistor supplies grid bias, while providing a modest amount of local negative feedback to help linearise the stage's response. A 100k resistor provides the plate load for the preamp stage. The cathode also has a 10k resistor to the "Bass" control connected to it; we'll discuss the function of these components a little later, as they are part of the global feedback network. 

Rain Detector Using Transistor


  This rain detector will give you a heads-up the instant it starts to rain, hopefully giving you time to close windows and bring in possessions. 
click on this image to enlarge

The battery-powered circuit draws virtually no current when the sensor is dry and the current consumption is low when the buzzer is activated so a couple of AA cells will last a long time. Alternately, a molded power supply with a simple voltage regulator to drop the voltage to 3 volts could be used. 
The circuit is basically a handy flasher circuit that operates well on only 3 volts using ordinary silicon transistors. When the circuit is triggered, the buzzer is pulsed about once per second for a very short time, giving it a "dripping water" sound which seems appropriate. A slower, longer beep may be had by increasing the 1 uF capacitor. The 10 k resistor may be increased for a longer beep time without decreasing the beep rate but at some point the circuit will cease to function properly, depending on the gain of the transistors. 


Wednesday, June 29, 2011

Smoke Detector Circuit


The A5347CA is a low-current, CMOS circuit providing all of the required features for an ionization-type smoke detector. A networking capability allows as many as 125 units to be interconnected so that if any unit senses smoke, all units will sound an alarm. In addition, special features are incorporated to facilitate alignment and test of the finished smoke detector. This device is designed to comply with Underwriters Laboratories Specification UL217.
 The internal oscillator and timing circuitry keeps standby power to a minimum by powering down the device for 1.66 seconds and sensing smoke for only 10 ms. Every 24 on/off cycles, a check is made for low battery condition. By substituting other types of sensors, or a switch for the ionization detector, this very-low power device can be used in numerous other battery-operated safety/security applications.
The A5347CA is supplied in a low-cost, 16-pin dual in-line plastic package. It is rated for continuous operation over the temperature range of 0°C to +50°C.
click on image to enlarge


The A5347CA is a low-current CMOS circuit providing all of the required features for an ionization-type smoke detector.

 Oscillator. An internal oscillator operates with a period of 1.67 seconds during no-smoke conditions. Every 1.67 seconds, internal power is applied to the entire circuit and a check is made for smoke. Every 24 clock cycles (40 seconds), the LED is pulsed and a check is made for low battery by comparing VDD to an internal reference. Since very-low currents are used in the device, the oscillator capacitor at pin 12 should be a low-leakage type (PTFE, polystyrene, or polypropylene).

Detector Circuitry. When smoke is detected, the resistor divider network that sets the sensitivity (smoke trip point) is altered to increase the sensitivity set voltage (pin 13) by typically 130 mV with no external
connections to pins 3 or 13. This provides hysteresis and reduces false triggering. An active guard is provided on both pins adjacent to the detector input (pin 15). The voltage at pins 14 and 16 will be within
100 mV of the input. This will keep surface leakage currents to a minimum and provide a method of measuring the input voltage without loading the ionization chamber. The active guard amplifier is not
power strobed and thus provides constant protection from surface leakage currents. The detector input has internal diode protection against static damage.

FINGERPRINT BASED VOTING MACHINE

The complete Voting machine consists mainly of two units - (a) Control Unit and (b) Balloting Unit with cable for connecting it with Control unit. A Balloting Unit caters upto 3 candidates. Four Balloting Units linked together catering in all to 64 candidates can be used with one control unit. The control unit is kept with the Presiding Officer and the Balloting Unit is used by the voter for polling. The Balloting Unit of EVM is a small Box-like device, on top of which each candidate and his/her election symbol is listed like a big ballot paper. Against each candidate's name, a button is provided. The voter polls his vote by pressing the button against the name of his desired candidate. 

click on image to enlarge

These utilize fingerprint recognition technology to allow access to only those whose fingerprints
you choose. It contains all the necessary electronics to allow you to store, delete, and verify fingerprints with just the touch of a button. Stored fingerprints are retained even in the event of complete power failure or battery drain. These eliminates the need for keeping track of keys or remembering a combination password, or PIN. It can only be opened when an authorized user is present, since there are no keys or combinations to be copied or stolen, or locks that can be picked. The main aim in designing this product is to provide the concept of the personal identity for each individual. This is extended to a special case of electronic voting machine concept. The summary of the design can be briefly explained diagrammatically as follows. As a pre-poll procedure the finger prints of all the voters are collected and stored in a database initially at time of distributing cards. At the time of voting, the option of the voter is taken along with the finger print.
 The finger print taken by the scanner is sent to the pc through an in-built A/D converter. The processed image is transferred to hard disk. The option entered by the voter is   transferred to chip through DEMUX and is stored in the memory. If the transferred image is matched with any of the records in the data base, then the interrupt is given by the HARD DISK to pc. Then the option is considered in the count.

High 800Watts Amplifier-using MOSFET


The 800 Watt AV amplifier is based on My 1kw Amplifier and shares the same topology and basic PCB layout. The only real difference is the number of Output devices that the unit uses. The 1kw design has 20 O/P devices, while the AV amplifier has 14 O/P devices. This amplifier can be used for practically any application that requires High power, low noise, distortion and excellent sound. Examples would be Sub-woofer amp, FOH stage amplifier, One channel of a very high-powered surround sound amplifier etc. The AV amplifier has four main stages of amplification. We will begin by looking at each stage in reasonable detail.
click on image to enlarge
                                                                                                         circuit of 800w MOSFET amplifier
The Error Amp Stage
The first stage is what I call an asymmetrical balance input error amplifier. It is a design, which allows only one single differential stage and yet has the ability to accept a balanced I/P source. An unbalanced source can be used if either the inverting or noninverting I/P is tied to signal ground.
Now I will explain how each device in this stage works together. Q20, Q21, R51- R54, form the main differential error amplifier, which then has its collectors connected to a cascode load. Q18, Q19, R49 and ZD2 form the cascode stage which provides a constant 14.4 volts on the collectors of Q20, 21. Q17, R48, R50, ZD1 and C12 form a constant current source, which supplies 1.5milliamps to the first differential stage. These modules form the first stage of the amplifier and basically set up how the whole amplifier is biased from front to back.

Tuesday, June 28, 2011

Locker Security System


The project locker security system is aimed at protecting the offering box from robbery. The project is based on micro-controller AT89C51 and some associated components. The major advantage of this security system other than the available security system is that this sounds and alarm and calls to a predefined mobile number when an attempt of robbery is detected.
The mobile number can be of any persons managing the offering box and there is an option for a second mobile number to which the controller makes a second call at the time of robbery. The second mobile number can be the number of police station, so police will get notified and they can do the necessary actions immediately.  
As soon as the mobile calling section is finished by the controller it will generate an alarm. This alarm can only be disabled by using a secure password. So this security system has 3 levels of protection, password protection, call to predefined mobile number and an alarm.

click on image to enlarge
The heart of the circuit is the micro-controller AT89c51.
The power supply unit supplies regulated 5volt to the controller using lm7805. The transformer steps down the ac voltage to 12volt and rectifier diodes are used to convert 12volt ac to 12volt DC. This 12volt DC is then regulated to 5volt using LM7805.
 The controller on power up initializes the whole system. There is a power on reset circuit connected to the reset pin of the controller. So whenever power is switched on the controller resets.
 As per the program logic the controller first configures the LCD for displaying initializing data on the screen. Then the controller goes for controlling and monitoring other hardware peripherals.
A keypad is connected to the circuit for entering the password. The controller then checks this password correct or not. If it’s correct code the controller then actuates the relay for opening the door. When the controller opens the door it disables the tampering circuit sensors for eliminating false triggering. For closing the door a door close key is provided. When the door is closed the controller immediately enables the tamper circuitry.
If a wrong password is entered more than 3 times the controller calls to the predefined number and sounds an alarm.
The tamper is detected using a special custom made vibration sensor which works on Newton’s 3rd law of motion. The vibration sensors give an interrupt to the controller to indicate a tamper.
The LCD display displays the name of the security system and gives direction to the user to enter password and also notifies the user if the password is wrong and also gives indication about the calls during tamper.
The door of the offering box is made using an electronic sliding mechanism. On entering the correct password the correct password the controller actuates relay1 and relay 2. The relay outputs are connected to the motor of the sliding door mechanism. To open the door the motor is given a polarity at which it rotates in clockwise direction and to close the door the polarity of the motor is reversed.
The crystal used is 12 MHz; this gives clock to the micro-controller.
Transistor logic is used to actuate switches on the mobile phone for making calls. The transistor BC-547 is used as a switch mode. When the controller gives negative to the respective transistor base that transistor gets switched on and the corresponding key on the mobile phone is actuated.
 A backup battery is provided to work when power loss occurs. So this will ensure the proper working of the circuit in all conditions.

Sunday, June 26, 2011

High Watts Amplifier


The main changes made in this design was the addition of a clipping detector circuit and bias circuit modifications for the use of International Rectifier HEXFET MOSFET’s. Later modifications where made to the error amp and VAS stages which improved the overall sound of the amplifier. The power supply components for this amplifier are as follows and are expressed for Two Channels. 1 x Toroidal Transformer with a Core rating of 625VA. Primary windings are made to suit your local mains supply. Eg: for Australia One single primary winding with a 240VAC rating. For USA, 110VAC, 115VAC and I believe there is a 220-Volt AC mains supply in some areas of the United States. For the UK it would be 220 VAC to 240 VAC.
click to enlarge

The secondary windings are as follows.
2 x 50 volts AC at full load.
One 400 Volt 35 Ampere, bridge rectifier.
2 x 4.7K 5 Watt ceramic resistors
Minimum filter capacitor requirements would be 2 x 10,000uf 100 volt electrolytic.
Ideal capacity would be 40,000uf per voltage rail.
A suggested power supply schematic is shown below with the schematic of
The amplifier.
When using this type of MOSFET in the AV800 amplifier is strongly recommended that the output stage devices be matched. As it has been found that if this is not done then there is no guarantee that they will share the current under load. The Source resistors provide only a bit of local feedback and don’t in any way force the devices to current share. The best method I have found to work very well utilises just a 150 Ohm 1 watt resistor and a +15 volt DC power supply. If you look at the schematic below it shows how to connect and measure the N-channel devices and the P-channel devices. With the devices connected, as shown measure across R1 with a multimeter set to DC volts and measurement of between 3.8 volts and 4.2 volts will be shown. Simply match the device in-groups to a tolerance of +-100mv. Please note that you only have to match the n-channel to the n-channel devices and the pchannel to the p-channel devices, not the N-channel devices to the P-channel devices.


Tuesday, June 14, 2011

Radio Frequency Based Attendance Register

Traditionally the attendance at an establishment is usually done in a book register. It is time consuming. It is very difficult to verify the attendance over long periods. This method is very time consuming and very difficult to verify the attendance over a week or above. Keeping attendance registers is space consuming. Here chances of doing malpractice in marking attendance are high.
 RFID based attendance system uses RFID tags for each person. A person marks the attendance by swiping the tag near RFID reader module. The attendance is temporarily saved in the EEPROM. At any time the circuit can be connected to a computer and the attendance is moved from EEPROM to a text file in computer. It has following advantages. (1) Simplicity and reliability, (2) Saving attendance in a computer allows easy verification and longer record keeping.
It works on radio frequency transmitters and receivers. Each person is given a RF ID card which is having a unique code. When it is swiped on a RF ID card reader, it reads the code and is stored. The attendance is temporarily saved in the EEPROM. At any time the circuit can be connected to a computer and the attendance is moved from EEPROM to a text file in computer. The advantage of this system is simplicity and reliability. Saving attendance in a computer allows easy verification and longer record keeping.
The DT125R series RFID Proximity OEM Reader Module has a built-in antenna in minimized form factor. It is designed to work on the industry standard carrier frequency of 125 kHz. This LF reader module with an internal or an external antenna facilitates communication with Read-Only transponders type UNIQUE or TK5530 via the air interface. The tag data is sent to the host systems via the wired communication interface with a protocol selected from the module pinout. The LF DT125R module is best suited for applications in Access Control, Time and Attendance, Asset Management, Handheld Readers, Immobilizers, and other RFID enabled applications.The AUTOMATIC DATA COLLECTION Technology used in th RFID reader.
WORKING

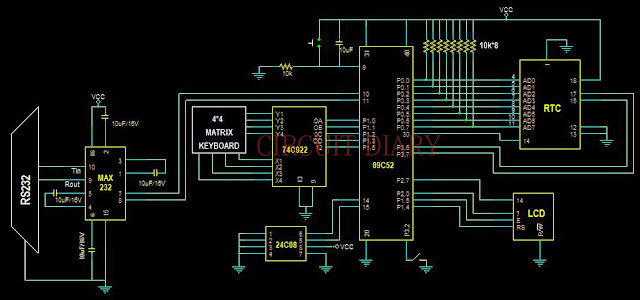
 Microcontroller reads time from real time chip DS12887. Whenever a RFID tag is brought near RFID module, it sends the card number in ASCII fomat to the microcontroller.  The microcontroller compares this number with those numbers in the  EEPROM. If match is found, it first check whether it is a master card, then it displays menu for master card. If not, it displays the ID number and then sends the time and date details along with ID number to EEPROM for marking daily attendance. If no matches found, the microcontroller displays ‘Card Not Programmed’ in LCD.

            Master card menu consists of set time, add, edit, delete, transfer. The various options are selected using the keypad keys- up, down, enter, cancel. Keypad encoder converts the key pressed into corresponding hex file. The output from RFID is given as the serial  input. The card ID number is 8 bytes long and two extra bytes serve as start and stop bits.

Set time: It is used to edit the time of RTC. The time is entered using the keypad.

Add: It is used to add a new tag and store the new tag number and ID number to EEPROM.

Edit: It is used to edit the card ID number. The new ID number is entered through keypad.

Delete: It is used to delete a card from record.

Transfer: This option is used to transfer the marked attendance stored in EEPROM to the computer.

MAX232 is used to convert the TTL voltage to RS232 compatible voltage. Real time clock is used to provide the date, month, and year details for marking the attendance.
Almost all electronic devices used in electronic circuits need a dc source of power supply to operate .The source of dc power is used to establish the dc operating points for the passive and active electronic devices incorporated in the system. The combination of a transformer, a rectifier, and a filter constitutes an ordinary dc supply, also called an unregulated power supply. For many applications in electronics unregulated power supply is not good because of the following reasons.
·                    Poor regulation.
·                    Variations in the ac supply main.
·                    Variations in temperature.

Download full Report with Source code

Twitter Delicious Facebook Digg Stumbleupon Favorites More